


备注
点击 这里 下载完整示例代码
ONNX简介 || 将PyTorch模型导出为ONNX || 扩展ONNX导出器操作符支持 || 将带控制流的模型导出为ONNX
导出PyTorch模型到ONNX
Created On: Oct 04, 2023 | Last Updated: Mar 05, 2025 | Last Verified: Nov 05, 2024
作者: Ti-Tai Wang, Justin Chu, Thiago Crepaldi。
备注
截至PyTorch 2.5,有两个版本的ONNX导出器。
torch.onnx.export(..., dynamo=True)是最新的(仍处于测试阶段)导出器,使用``torch.export``和Torch FX捕获图形。它随PyTorch 2.5一起发布。torch.onnx.export使用TorchScript并自PyTorch 1.2.0以来一直可用。
在 60分钟速成教程 中,我们有机会从高层次了解PyTorch并训练一个小型神经网络以分类图像。在本教程中,我们将扩展此内容,描述如何使用``torch.onnx.export(…, dynamo=True)`` ONNX导出器将PyTorch模型转换为ONNX格式。
虽然PyTorch非常适合模型开发迭代,但模型可以使用包括`ONNX <https://onnx.ai/>`_(开放神经网络交换)在内的不同格式部署到生产环境!
ONNX是一种表示机器学习模型的灵活开放标准格式,通过对机器学习的标准化表示,允许模型在从大型基于云的超级计算机到资源受限的边缘设备(如您的网络浏览器和手机)的各种硬件平台和运行环境中执行。
在本教程中,我们将学习如何:
安装所需的依赖项。
编写一个简单的图像分类器模型。
将模型导出为ONNX格式。
将ONNX模型保存到文件中。
使用`Netron <https://github.com/lutzroeder/netron>`_可视化ONNX模型图。
使用`ONNX Runtime`执行ONNX模型。
比较PyTorch结果和ONNX Runtime的结果。
1. 安装所需的依赖项
因为ONNX导出器使用``onnx``和``onnxscript``将PyTorch操作符翻译为ONNX操作符,所以我们需要安装它们。
pip install --upgrade onnx onnxscript
2. 编写一个简单的图像分类器模型
一旦环境设置完成后,让我们开始用PyTorch建模我们的图像分类器,就像我们在`60分钟速成教程 <https://pytorch.org/tutorials/beginner/deep_learning_60min_blitz.html>`_中所做的一样。
import torch
import torch.nn as nn
import torch.nn.functional as F


class ImageClassifierModel(nn.Module):
    def __init__(self):
        super().__init__()
        self.conv1 = nn.Conv2d(1, 6, 5)
        self.conv2 = nn.Conv2d(6, 16, 5)
        self.fc1 = nn.Linear(16 * 5 * 5, 120)
        self.fc2 = nn.Linear(120, 84)
        self.fc3 = nn.Linear(84, 10)

    def forward(self, x: torch.Tensor):
        x = F.max_pool2d(F.relu(self.conv1(x)), (2, 2))
        x = F.max_pool2d(F.relu(self.conv2(x)), 2)
        x = torch.flatten(x, 1)
        x = F.relu(self.fc1(x))
        x = F.relu(self.fc2(x))
        x = self.fc3(x)
        return x
3. 将模型导出为ONNX格式
现在我们已经定义了模型,需要将其实例化并创建一个随机32x32输入。然后,我们可以将模型导出为ONNX格式。
torch_model = ImageClassifierModel()
# Create example inputs for exporting the model. The inputs should be a tuple of tensors.
example_inputs = (torch.randn(1, 1, 32, 32),)
onnx_program = torch.onnx.export(torch_model, example_inputs, dynamo=True)
[torch.onnx] Obtain model graph for `ImageClassifierModel([...]` with `torch.export.export(..., strict=False)`...
[torch.onnx] Obtain model graph for `ImageClassifierModel([...]` with `torch.export.export(..., strict=False)`... ✅
[torch.onnx] Run decomposition...
[torch.onnx] Run decomposition... ✅
[torch.onnx] Translate the graph into ONNX...
[torch.onnx] Translate the graph into ONNX... ✅
3.5.(可选)优化ONNX模型
可以对ONNX模型进行优化,例如常量折叠和消除多余节点。优化是在原位完成的,因此原始ONNX模型会被修改。
正如我们所看到的,无需对模型进行任何代码更改。生成的ONNX模型以二进制protobuf文件的形式存储在``torch.onnx.ONNXProgram``中。
4. 将ONNX模型保存到文件
虽然将导出的模型加载到内存中在许多应用中非常有用,但我们可以使用以下代码将其保存到磁盘:
onnx_program.save("image_classifier_model.onnx")
您可以将ONNX文件加载回内存并使用以下代码检查它是否格式正确:
import onnx

onnx_model = onnx.load("image_classifier_model.onnx")
onnx.checker.check_model(onnx_model)
5. 使用Netron可视化ONNX模型图
现在我们已将模型保存到文件中,可以使用`Netron <https://github.com/lutzroeder/netron>`_进行可视化。Netron可以安装在macOS、Linux或Windows计算机上,也可以直接从浏览器运行。让我们通过打开以下链接尝试Web版本:https://netron.app/。
Netron打开后,我们可以将``image_classifier_model.onnx``文件拖放到浏览器内或在点击**打开模型**按钮后选择它。
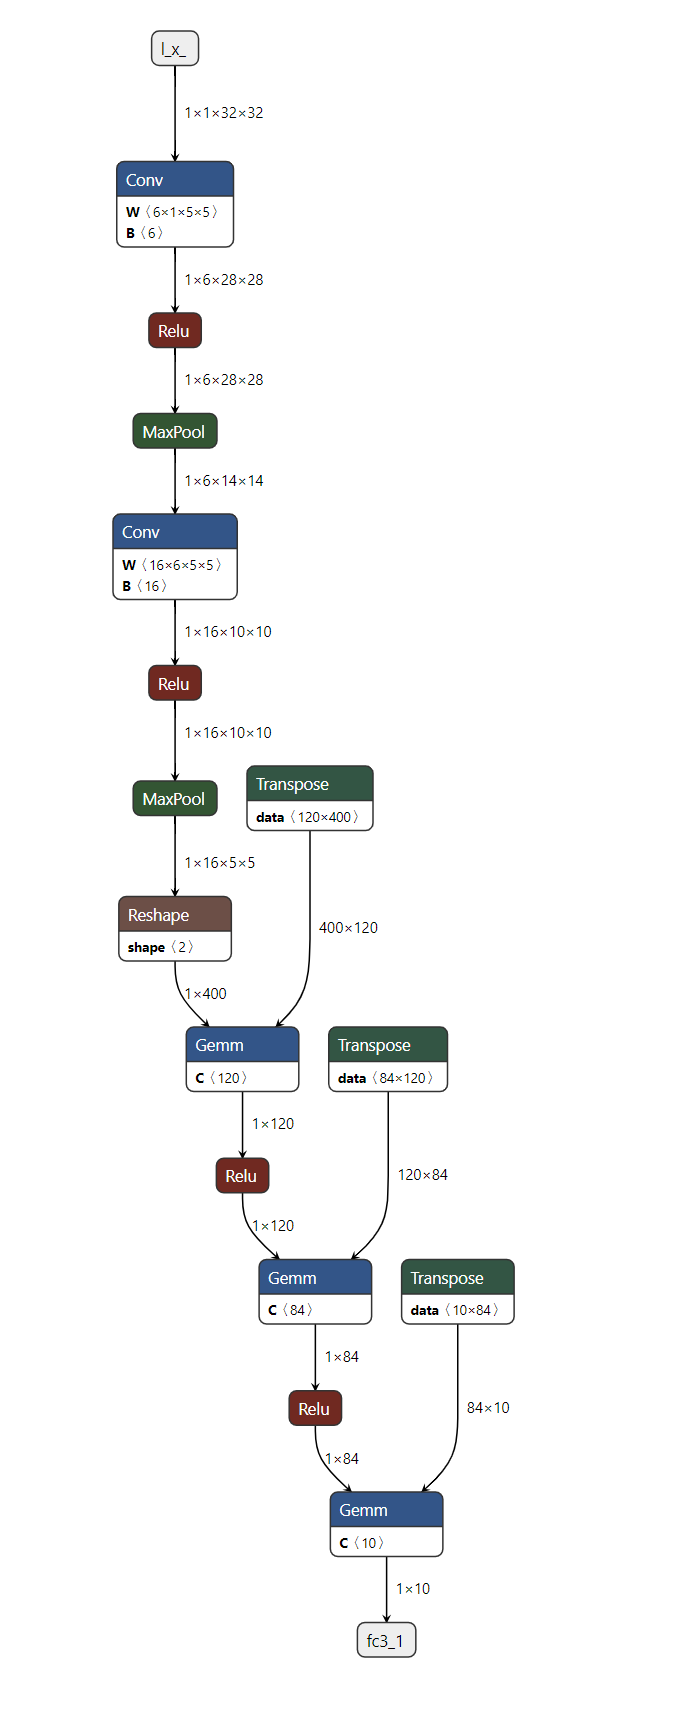
到此为止!我们已成功将PyTorch模型导出为ONNX格式并使用Netron对其进行了可视化。
6. 使用ONNX Runtime执行ONNX模型
最后一步是使用`ONNX Runtime`执行ONNX模型,但在此之前,让我们安装ONNX Runtime。
pip install onnxruntime
ONNX标准不支持PyTorch的所有数据结构和类型,因此我们需要在将输入提供给ONNX Runtime之前将PyTorch的输入适配成ONNX格式。在我们的示例中,输入恰好是相同的,但在更复杂的模型中可能有比原始PyTorch模型更多的输入。
ONNX Runtime需要额外的步骤,包括将所有PyTorch张量转换为Numpy(在CPU中),并将它们包裹在一个字典中,其键为输入名称的字符串,值为Numpy张量。
现在我们可以创建一个*ONNX Runtime推理会话*,使用处理后的输入执行ONNX模型并获取输出。在本教程中,ONNX Runtime在CPU上执行,但也可以在GPU上执行。
import onnxruntime

onnx_inputs = [tensor.numpy(force=True) for tensor in example_inputs]
print(f"Input length: {len(onnx_inputs)}")
print(f"Sample input: {onnx_inputs}")

ort_session = onnxruntime.InferenceSession(
    "./image_classifier_model.onnx", providers=["CPUExecutionProvider"]
)

onnxruntime_input = {input_arg.name: input_value for input_arg, input_value in zip(ort_session.get_inputs(), onnx_inputs)}

# ONNX Runtime returns a list of outputs
onnxruntime_outputs = ort_session.run(None, onnxruntime_input)[0]
Input length: 1
Sample input: [array([[[[-0.35674053,  0.42074242,  0.19546998, ...,  0.47318685,
          -0.05343219,  0.32105207],
         [-0.625433  ,  0.81250304, -0.5218808 , ..., -0.03959777,
          -1.0136392 ,  1.6170032 ],
         [-0.23660132,  0.39427972, -1.4611188 , ..., -0.3389966 ,
           1.057928  , -0.6588078 ],
         ...,
         [ 2.0307424 ,  0.6537012 , -1.4203125 , ..., -0.2885364 ,
           0.32102957, -0.6814483 ],
         [-0.1977268 , -0.13559689, -0.78255934, ...,  1.5413003 ,
           0.5309439 ,  0.19546905],
         [-2.2801065 , -0.40365064, -0.89845794, ...,  0.02425034,
          -1.1153787 , -0.590127  ]]]], dtype=float32)]
7. 比较PyTorch结果与ONNX Runtime的结果
确定导出的模型是否表现良好的最佳方法是与PyTorch进行数值评估,PyTorch是我们的真值来源。
为此,我们需要使用相同的输入执行PyTorch模型,并将结果与ONNX Runtime的结果进行比较。在比较结果之前,我们需要将PyTorch的输出转换为匹配ONNX的格式。
torch_outputs = torch_model(*example_inputs)

assert len(torch_outputs) == len(onnxruntime_outputs)
for torch_output, onnxruntime_output in zip(torch_outputs, onnxruntime_outputs):
    torch.testing.assert_close(torch_output, torch.tensor(onnxruntime_output))

print("PyTorch and ONNX Runtime output matched!")
print(f"Output length: {len(onnxruntime_outputs)}")
print(f"Sample output: {onnxruntime_outputs}")
PyTorch and ONNX Runtime output matched!
Output length: 1
Sample output: [[ 0.08005083 -0.06414808 -0.05545557  0.08101175  0.12032615 -0.0140993
  -0.04354338 -0.04572574  0.04457211 -0.00016464]]
总结
就是这样!我们成功将PyTorch模型导出为ONNX格式,将模型保存到磁盘,使用Netron查看它,使用ONNX Runtime执行它并最终比较其数值结果与PyTorch的结果。
进一步阅读
以下列表包含从基础示例到高级场景的教程,不一定按列出的顺序排列。可以直接跳到您感兴趣的特定主题,或者坐稳了逐步浏览所有内容,了解关于ONNX导出器的一切。
脚本总运行时间: (0 分钟 1.574 秒)
